
 |
 |
Dan Wallach, Rice University
Originally April 2002
Updated March 2005
Many people have asked me questions about how I take pictures, particularly pictures of dancers. Here are my thoughts on what you need to do decent social dance photography. Note that, while this advice is targeted to digital cameras, most of it applies equally well to film cameras.
|
|
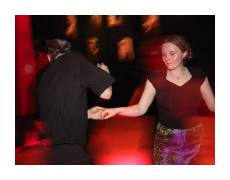
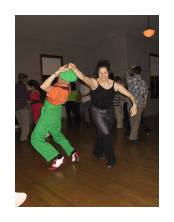
 Get a tripod. Both of the above pictures were taken by hand-holding the camera.
While the flash will create the "freeze" of your foreground subject,
your background gets blurred. Maybe that's something you want. But, if you
want the background to be stable, then you need to stabilize the whole camera.
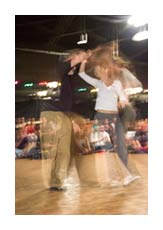
Here's an example that puts it all together. (A tripod is virtually useless
in a crowded dance floor, but it's great for competitions, where you can stake
out your space and not have to worry about getting bumped.)
Get a tripod. Both of the above pictures were taken by hand-holding the camera.
While the flash will create the "freeze" of your foreground subject,
your background gets blurred. Maybe that's something you want. But, if you
want the background to be stable, then you need to stabilize the whole camera.
Here's an example that puts it all together. (A tripod is virtually useless
in a crowded dance floor, but it's great for competitions, where you can stake
out your space and not have to worry about getting bumped.)
Prices have dropped enough that you should seriously consider a digital SLR cameras like a Nikon D70 or a Canon Digital Rebel XT / 350D. Relative to the smaller "prosumer" cameras, you get faster frame rates (3 frames per second), faster autofocus, and a variety of accessories that you can add later on. When the action is moving fast, that additional speed is a big win. Most of these cameras are available with "kit" lenses. I've gotten great mileage out of my Nikon 18-70mm kit zoom. It's bright, it's fast, and it's versatile. Particularly for dancing, I tend to shoot with it on the wide-angle end, so try not to let a camera shop talk you into a cheaper lens that isn't as wide-angle.
The most important tool in the darkroom is the trash can.While you should take many pictures, you should only show people the ones that you really like. Don't be discouraged if you only get one good picture out of every fifty that you take. With digital cameras, pressing the button is virtually free, so shoot first and ask questions later.
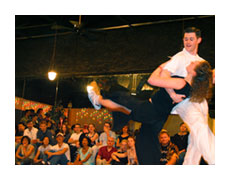
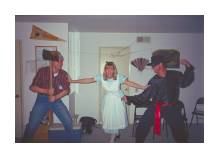
 One of the effects that long exposures give is the experience of motion.
You can also achieve this effect by freezing people in positions where they
are clearly doing a dynamic move. Aerial moves are an obvious example, but
you can also get this effect when dancers are strongly counter-balanced or
in the middle of a "normal" step. Here's an example.
One of the effects that long exposures give is the experience of motion.
You can also achieve this effect by freezing people in positions where they
are clearly doing a dynamic move. Aerial moves are an obvious example, but
you can also get this effect when dancers are strongly counter-balanced or
in the middle of a "normal" step. Here's an example.
There are many books on this subject. Buy one and read the whole thing. Here are some recommendations:
The Kieran book doesn't cover all the newest features in Photoshop CS, but it's just amazingly detailed in all the ways you can clean up color issues. You may not need it all on day one, but it's a fantastic reference book. The Kelby book (and lots of others like it) introduces some of the crazy new Photoshop CS features and covers a wider array of techniques.
Many images have small "bugs" in them. If your picture came from film, you will have dust spots and scratches. If your picture came from a digital camera, you may still have "hot pixels" or perhaps just a distracting food stain on a shirt. In Photoshop, the "clone tool" lets you trivially fix these bugs. You do not need to make a picture be perfect, but fixing these little bugs can remove distractions from the beauty of the photograph.
Even when you're shooting with a digital camera, the color recorded by your camera is often less than perfect, especially when you're shooting at night or indoors. Your camera tries to compensate for this, but it doesn't always do a perfect job. In the old chemistry days, this would take you hours of careful tweaking to fix, and you were limited in exactly what you could and could not easily fix.
In Photoshop, you just just use Adjust Levels. Let's pretend you had black & white pictures to keep it simple. Adjust Levels shows you an image histogram and gives you three sliders. You get to say "absolute black is here, absolute white is here, and 50% grey is here." By dragging three sliders, you get to fix you contrast and brightness and gamma response, all in a nice, intuitive fashion. It rocks. You can get even more detailed by using Curves. To master those, you really need the Kieran book as a reference to guide you.
Even better, when you shoot "raw" images, then you can use Photoshop's amazing Adobe Camera Raw (ACR), introduced as part of Photoshop CS. ACR is amazingly flexible. With a single click, you can point at somebody's white shirt and say "make this be white". You can easily make all the most common tweaks you might want to perform (fixing brightness and contrast, sharpening the image, filtering out noise from your camera sensor, and plenty more), all from one simple interface. Even better, you can get one picture right, "apply" the settings to every other picture you took at the same time, and then use a batch action to convert them all to JPEG at once.
(Tip: you may want to get yourself a cheap "grey card" that you can use for a reference photo. I have WhiBal plastic card-set that does the job nicely.)
My Canon G2's native size is 2048x1536 pixels. My Nikon D70's native size is 3008x2000 pixels. I import these pictures, at full resolution, into Photoshop. I do all my adjustments at the full resolution, then shrink to 800x600 only at the last minute before publishing on the web. (Photoshop's "Web Photo Gallery" does all of this for you, automatically.) Why the change in resolution? Every time you modify an image, particularly by adjusting contrast and brightness, you're throwing away a certain amount of information. To see this, use "Adjust Levels", make a drastic change to an image's gamma (moving the middle slider), select "OK", then use "Adjust Levels" again. The first time, the histogram was probably smooth. This time, it has many spikes and lots of blank stuff in between. Those holes are grey-levels that your photo no longer has.
When you shrink the image after you're done adjusting it, you'll notice the histogram is again smooth. This gives you the highest-possible quality for your final web page. (In case you're curious, this same effect happens with audio recording. This is why digital recording studios use higher resolution when mixing than is available on the final compact disc.)
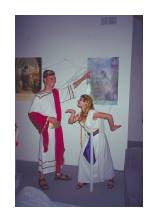
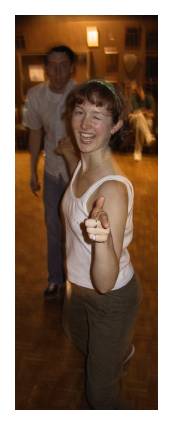 Some photographers make a habit of always showing you their entire
photographed image (in the analog world, they might even include the film
edges with the sprocket holes in the final print). But, nobody ever said
it was required. Often, you can improve a picture by cutting stuff
out. For this picture here, the sides had nothing particularly interesting
(some people standing around). By cropping them away, you can focus the
viewer on the subject of the photograph.
Some photographers make a habit of always showing you their entire
photographed image (in the analog world, they might even include the film
edges with the sprocket holes in the final print). But, nobody ever said
it was required. Often, you can improve a picture by cutting stuff
out. For this picture here, the sides had nothing particularly interesting
(some people standing around). By cropping them away, you can focus the
viewer on the subject of the photograph.
Another note on cropping: when you do this, your thumbnails will not necessarily all be the same size any more, and laying them out on a Web page naively will look unattractive. If you go look at this cropped photograph in context, you'll see how I matched its width with the picture above it in the same table layout. You should also consider that, for your thumbnails, you could crop further, perhaps focusing only on the faces. This would let you shrink the images less, preserving details like facial expressions. Likewise, for strongly vertical pictures like this, you could work with a page layout that doesn't require space for the tall, vertical element.
Thanks to Danil Suits, Paul Dandurand, and Marty Lyons for their help and feedback on this document.